Communicating the custom shade of a single central or any single unit in the anterior region is one of the most difficult tasks taken on by dentists and technicians. It is also extremely critical for cosmetic dentistry purposes. Accurately portraying what the dentist sees requires more than just a photo. Properly interpreting the information to the ceramist is key . The objective of this blog is to alleviate the difficulty in this scenario. Six easy steps should get everyone on the same page.
- Take the Custom Shade and Photos Prior to any Treatment – Enamel can dehydrate quickly and will increase the overall value of a tooth. Often times giving the appearance of hypocalcification spots or a higher value on the teeth. Anesthetic shots, open mouth breathing and prepped teeth are all steps that dehydrate teeth.
- Evaluate from Multiple Angles – Observe the teeth from multiple angles. This will help you determine the shine and surface texture. Identify whether the patients teeth have a high or dull shine, heavy, minimal or no surface texture and document.
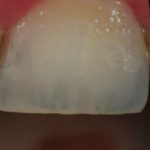
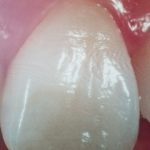
- Record the Depth of Color – This is noted by declaring a tooth or portion of tooth as opaque or translucent. If the chroma(color) appears to be right on the surface this would be considered opaque but if the color appears to come from deep within the tooth this tooth would be more translucent and the ceramist can then determine how to appropriately build the case. (See Photos below)
- Take Photos – Take photos of the tooth you are looking to match. One photo should be just of the tooth being matched for the technician to see the intricacies. Other photos should be of the closest two or three shade tabs that match the tooth. These photos should be taken incisal edge of the tooth to incisal edge of the shade tab and on the same plane.
- Map What you see – Photos are never as accurate as what is seen in the chair. Make a quick diagram of the tooth and break it in to nine sections. Quickly sketch what you see. This will allow the technician to look for any particular intracacies in the photos. Break the drawing into nine parts drawing a gingival, middle and incisal third and then a mesial, middle and distal third.
- Take a Preparation Shade – Once the case is prepped document the shade of the prep with a photo and shade tab photo. All-porcelain restorations seem to be the materials of choice today. Knowing whether to utilize the prep shade or block it out is extremely important to your laboratory.
Utilizing these six steps will aid in great communication between clinicians and technicians. This will help facilitate an excellent cosmetic result for the patient.